> ## Documentation Index
> Fetch the complete documentation index at: https://docs.sensbot.ai/llms.txt
> Use this file to discover all available pages before exploring further.
# Selly Email Assistant Setup
> Connect Sensbot Email Assistant to your Selly shop: create a read-only API key, send it to us, and get reply drafts grounded in your Selly orders
Most of a shop's support mail is the same handful of questions: where is my order, when will it arrive, can I return this, is this in stock. Answering one means opening the order in the Selly panel, finding the parcel number, and writing the reply.
Sensbot Email Assistant does both parts for shops on [Selly](https://www.selly.pl). It reads the mail arriving in your support mailbox, finds the order the customer is writing about in your Selly data, and leaves the reply waiting in your **Drafts** folder: the order status, the carrier, the tracking number with its tracking link. You open the draft, change what you want, and send it.
The assistant **never sends**. Every reply is a draft in your own mailbox until a person sends it.
Selly has no app store, so there is nothing to install. You create one **read-only** API key in your Selly panel and send it to us, and we connect your shop. The key cannot change anything in your shop, and it only works from Sensbot's server.
***
## Before you start
| Requirement | Why |
| - | - |
| Access to your Selly admin panel (**Konfiguracja**) | You create the API key there |
| A support mailbox on Gmail, Microsoft 365 / Outlook, or any IMAP host | This is where the drafts appear |
| About five minutes | Step 1 is the only thing done in Selly |
***
## Step 1 · Create a read-only API key in Selly
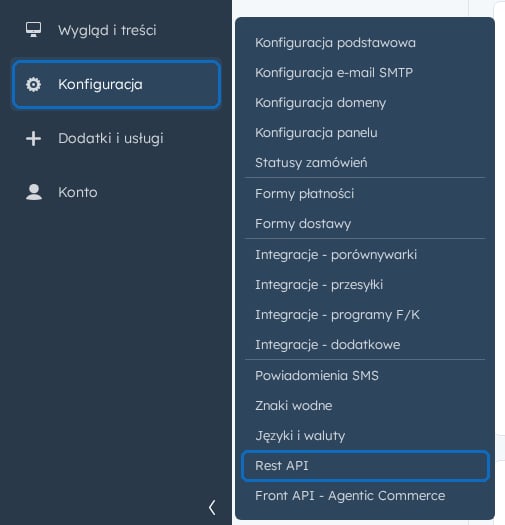
1. In your Selly admin panel, open **Konfiguracja**, then **Rest API**.
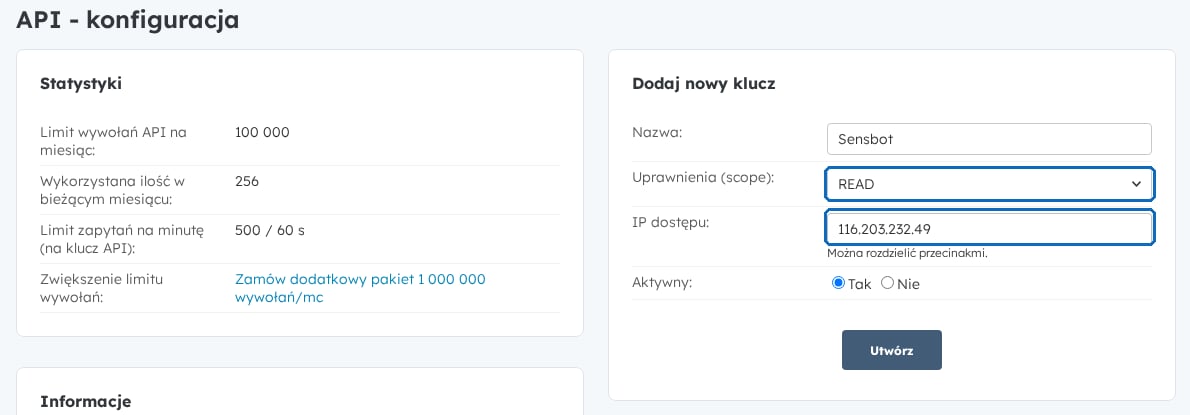
 2. In the **Dodaj nowy klucz** (Add new key) box, fill in:
* **Nazwa** (Name): `Sensbot`
* **Uprawnienia (scope)**: `READ`. The form starts on `READWRITE`, so change it. Sensbot only reads.
* **IP dostępu** (Allowed IP): `116.203.232.49`. This is Sensbot's server; the key will work from nowhere else.
* **Aktywny** (Active): `Tak`
3. Click **Utwórz** (Create).
2. In the **Dodaj nowy klucz** (Add new key) box, fill in:
* **Nazwa** (Name): `Sensbot`
* **Uprawnienia (scope)**: `READ`. The form starts on `READWRITE`, so change it. Sensbot only reads.
* **IP dostępu** (Allowed IP): `116.203.232.49`. This is Sensbot's server; the key will work from nowhere else.
* **Aktywny** (Active): `Tak`
3. Click **Utwórz** (Create).
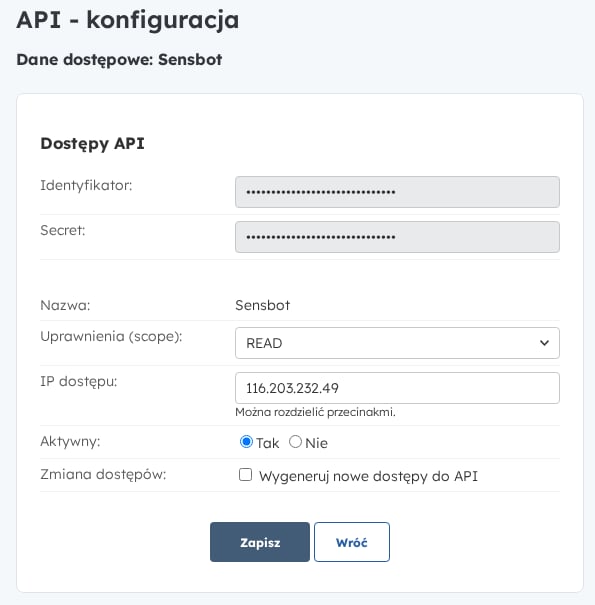
 Selly opens the new key and shows its **Identyfikator** (identifier) and **Secret**. Keep this page open for step 2.
 ***
## Step 2 · Send us the key
Write to [support@sensbot.ai](mailto:support@sensbot.ai) with:
* The address of your shop, for example `https://yourshop.pl`
* The **Identyfikator** and the **Secret** from step 1
* The email address you want your Sensbot account on
Sending the key by email is safe enough here: it can only read, and Selly accepts it only from Sensbot's server address. Would rather not send it by email anyway? Say so and we will agree another way.
***
## Step 3 · We connect your shop, you set your password
1. We check the key against your shop and import your products, categories and recent orders.
2. We create your Sensbot account and email you a link to **set your password**. The link is valid for 30 days.
3. Open the link, choose a password, and you are in the [Sensbot dashboard](https://platform.sensbot.ai).
Link expired or lost? Go to [platform.sensbot.ai](https://platform.sensbot.ai), click **Forgot password**, and enter the same email address. You get a fresh link.
From here on, Sensbot keeps your Selly data current on its own, checking for new and changed orders every few minutes.
***
## Step 4 · Connect your mailbox
Until a mailbox is attached, the assistant has nothing to read and writes no drafts.
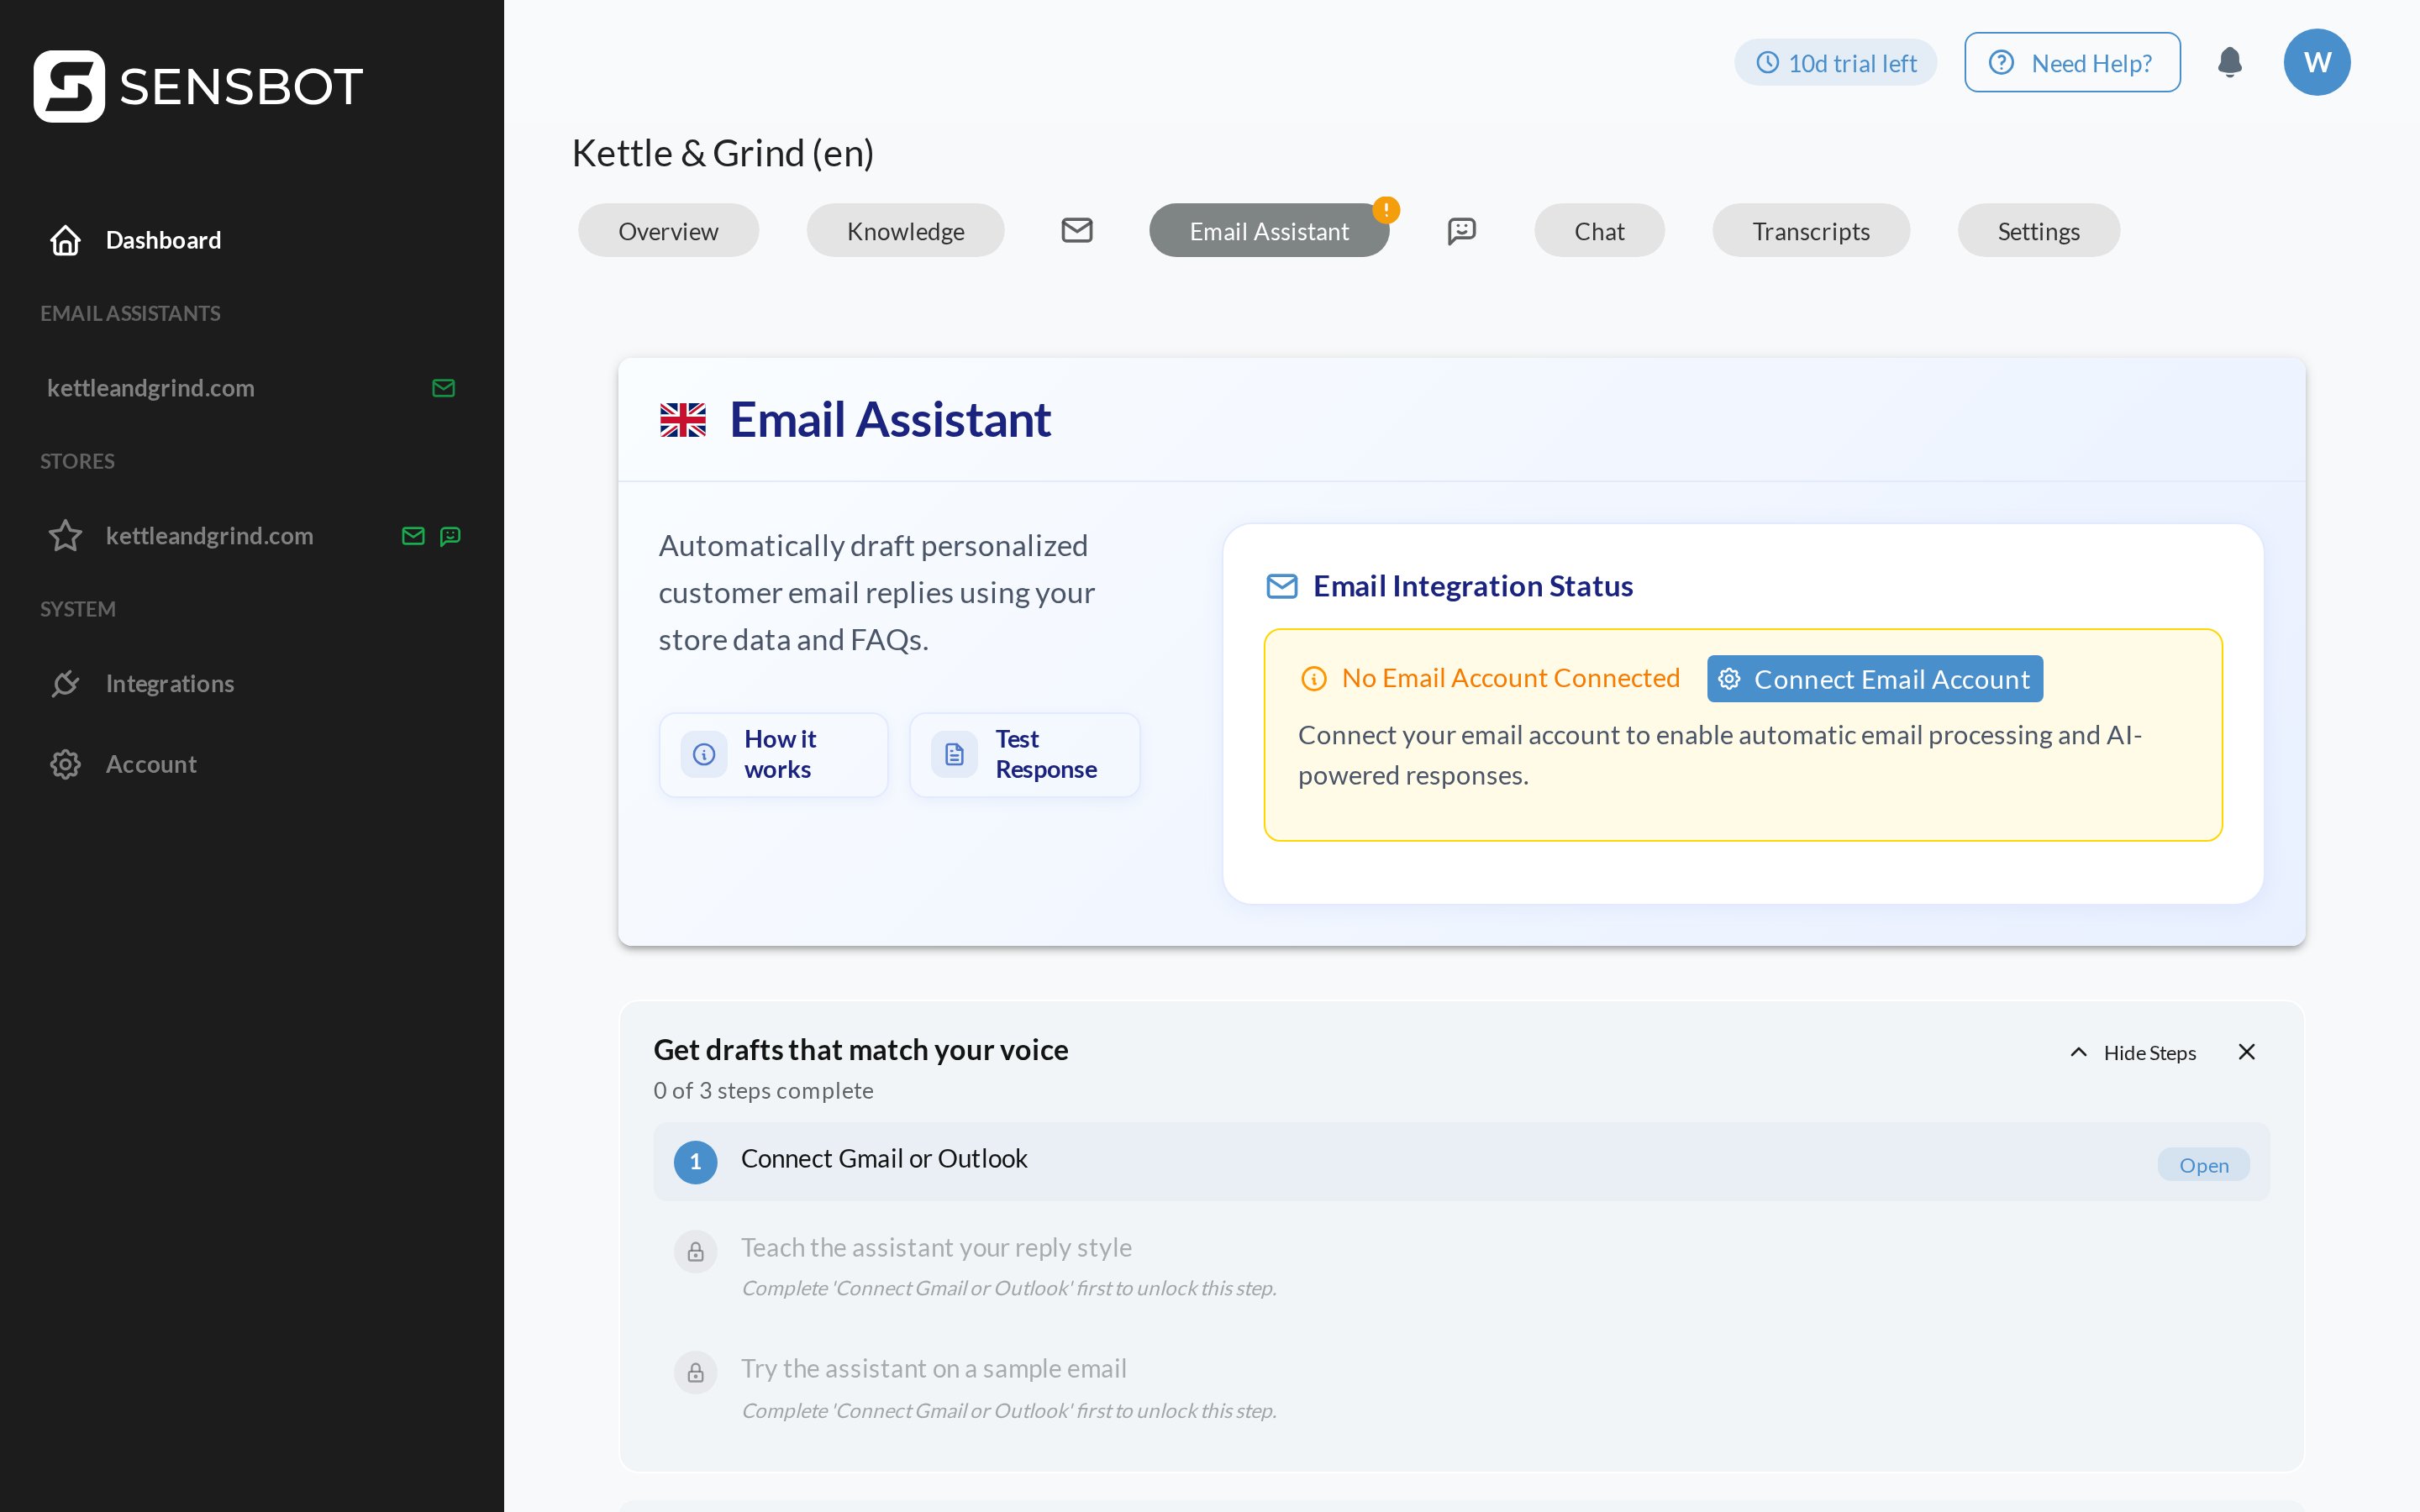
1. In the dashboard, open the **Email Assistant** tab for your shop.
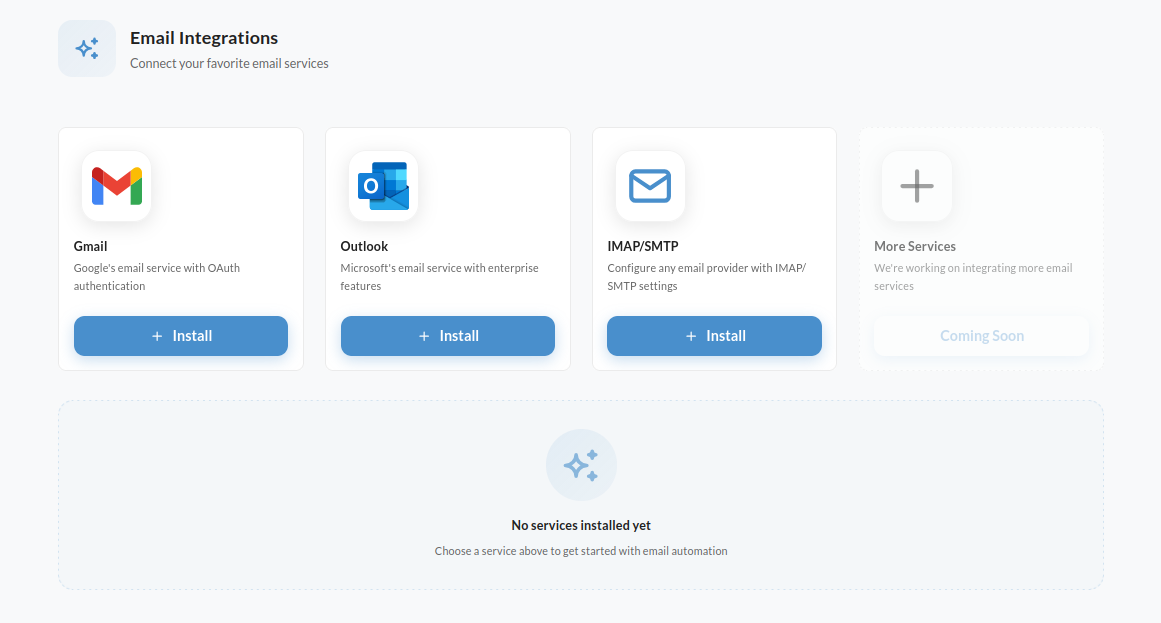
2. Click **Connect Email Account** and choose how to connect:
* **Gmail**: sign in to Google and confirm access.
* **Outlook / Microsoft 365**: sign in to Microsoft and confirm access.
* **IMAP / SMTP**: enter your mail server details.
***
## Step 2 · Send us the key
Write to [support@sensbot.ai](mailto:support@sensbot.ai) with:
* The address of your shop, for example `https://yourshop.pl`
* The **Identyfikator** and the **Secret** from step 1
* The email address you want your Sensbot account on
Sending the key by email is safe enough here: it can only read, and Selly accepts it only from Sensbot's server address. Would rather not send it by email anyway? Say so and we will agree another way.
***
## Step 3 · We connect your shop, you set your password
1. We check the key against your shop and import your products, categories and recent orders.
2. We create your Sensbot account and email you a link to **set your password**. The link is valid for 30 days.
3. Open the link, choose a password, and you are in the [Sensbot dashboard](https://platform.sensbot.ai).
Link expired or lost? Go to [platform.sensbot.ai](https://platform.sensbot.ai), click **Forgot password**, and enter the same email address. You get a fresh link.
From here on, Sensbot keeps your Selly data current on its own, checking for new and changed orders every few minutes.
***
## Step 4 · Connect your mailbox
Until a mailbox is attached, the assistant has nothing to read and writes no drafts.
1. In the dashboard, open the **Email Assistant** tab for your shop.
2. Click **Connect Email Account** and choose how to connect:
* **Gmail**: sign in to Google and confirm access.
* **Outlook / Microsoft 365**: sign in to Microsoft and confirm access.
* **IMAP / SMTP**: enter your mail server details.
 Shared mailboxes such as `info@yourshop.pl` on Microsoft 365 need a little extra care: see [Microsoft 365 Setup](/customization/email-assistant/outlook-addin/microsoft-365-setup). Answering customers in Thulium rather than in a mailbox? See [Thulium](/integrations/thulium).
The assistant then reads the replies you have already sent and copies how your shop writes: greeting, sign-off, length, how formal you are. Shape it further in the dashboard:
* **[Writing style](/customization/email-assistant/writing-style)**: signature, greeting, tone.
* **[Custom instructions](/customization/email-assistant/custom-instructions)**: what to promise, what never to say.
* **[Email filters](/customization/email-assistant/email-filters)**: which messages it should touch at all.
***
## What Sensbot reads from Selly
| Data | Used for |
| - | - |
| Orders: number, status, items, totals, carrier, tracking number | "Where is my order" and "when will it arrive" replies |
| Products, variants and stock | Questions about a product, a size or availability |
| Categories | Pointing customers to the right part of your shop |
| Returns (*odstąpienie od umowy*) | Questions about a return already filed |
| Your shop's information pages (terms, shipping costs, payment methods, contact) | Answers that follow your own policies |
Sensbot reads only. It never changes an order, a product or a setting in Selly.
***
## Disconnecting
In Selly, open **Konfiguracja → Rest API**, open the `Sensbot` key and set **Aktywny** to `Nie`, or delete the key. Sensbot loses access immediately. Write to [support@sensbot.ai](mailto:support@sensbot.ai) if you also want your Sensbot account closed.
This documentation is built and hosted on [Mintlify](https://mintlify.com), a developer documentation platform.
Shared mailboxes such as `info@yourshop.pl` on Microsoft 365 need a little extra care: see [Microsoft 365 Setup](/customization/email-assistant/outlook-addin/microsoft-365-setup). Answering customers in Thulium rather than in a mailbox? See [Thulium](/integrations/thulium).
The assistant then reads the replies you have already sent and copies how your shop writes: greeting, sign-off, length, how formal you are. Shape it further in the dashboard:
* **[Writing style](/customization/email-assistant/writing-style)**: signature, greeting, tone.
* **[Custom instructions](/customization/email-assistant/custom-instructions)**: what to promise, what never to say.
* **[Email filters](/customization/email-assistant/email-filters)**: which messages it should touch at all.
***
## What Sensbot reads from Selly
| Data | Used for |
| - | - |
| Orders: number, status, items, totals, carrier, tracking number | "Where is my order" and "when will it arrive" replies |
| Products, variants and stock | Questions about a product, a size or availability |
| Categories | Pointing customers to the right part of your shop |
| Returns (*odstąpienie od umowy*) | Questions about a return already filed |
| Your shop's information pages (terms, shipping costs, payment methods, contact) | Answers that follow your own policies |
Sensbot reads only. It never changes an order, a product or a setting in Selly.
***
## Disconnecting
In Selly, open **Konfiguracja → Rest API**, open the `Sensbot` key and set **Aktywny** to `Nie`, or delete the key. Sensbot loses access immediately. Write to [support@sensbot.ai](mailto:support@sensbot.ai) if you also want your Sensbot account closed.
This documentation is built and hosted on [Mintlify](https://mintlify.com), a developer documentation platform.