> ## Documentation Index
> Fetch the complete documentation index at: https://docs.sensbot.ai/llms.txt
> Use this file to discover all available pages before exploring further.
# Outlook on the web – Installation
> How to install the Sensbot AI add-in for Outlook on the web and the new Outlook for Windows — for Microsoft 365 administrators and personal Outlook.com accounts
# Outlook on the web – Installation
The Sensbot AI add-in for **Outlook on the web** drafts AI replies to customer emails directly inside Outlook, using your real store data such as orders, products, and shipping status. It appears in the same Outlook add-ins toolbar and shows the identical Sensbot AI panel as the [classic desktop add-in](/customization/email-assistant/outlook-addin/installation).
This procedure also applies to the **new Outlook for Windows** — the new desktop app uses the same web add-in. Follow these steps whether you use Outlook in a browser or the new Outlook for Windows app. The [classic desktop installer](/customization/email-assistant/outlook-addin/installation) is only for the older classic Outlook.
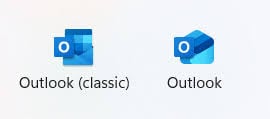
Not sure which app you have? Check the icon — **Outlook (classic)** on the left, the **new Outlook** on the right:
 How you install it depends on your account type:
* **Business / work account (Microsoft 365)** — your administrator installs it once for everyone. See **Path A**.
* **Personal account (Outlook.com / free)** — you install it yourself. See **Path B**.
Both paths use the same manifest. **Business** accounts provide it as a link; **personal** accounts download it and upload the file.
The web add-in supports **only Microsoft mailboxes** (Microsoft 365 or Outlook.com). If your support inbox is a **Gmail, IMAP, or POP** account connected to Outlook, use the [classic desktop add-in](/customization/email-assistant/outlook-addin/installation) instead.
```
https://platform.sensbot.ai/outlook/manifest.xml
```
***
## Path A · Business / Microsoft 365 (administrator install)
This path is for a Microsoft 365 **global administrator**. It deploys the Sensbot **panel** to your organization so it appears automatically in your users' Outlook, with no per-user installation.
Installing the panel is separate from connecting the mailbox Sensbot drafts replies for. If you use a **shared mailbox** (like `info@yourstore.com`), or you hit a **"Need admin approval"** screen when connecting, see [Microsoft 365 Setup](/customization/email-assistant/outlook-addin/microsoft-365-setup).
### Before you start
* You need to be a **Global administrator** (or Office Apps admin) in Microsoft 365.
* Your users must have **Exchange Online mailboxes** (any Microsoft 365 Business or Enterprise plan).
### Step 1 · Open Integrated apps
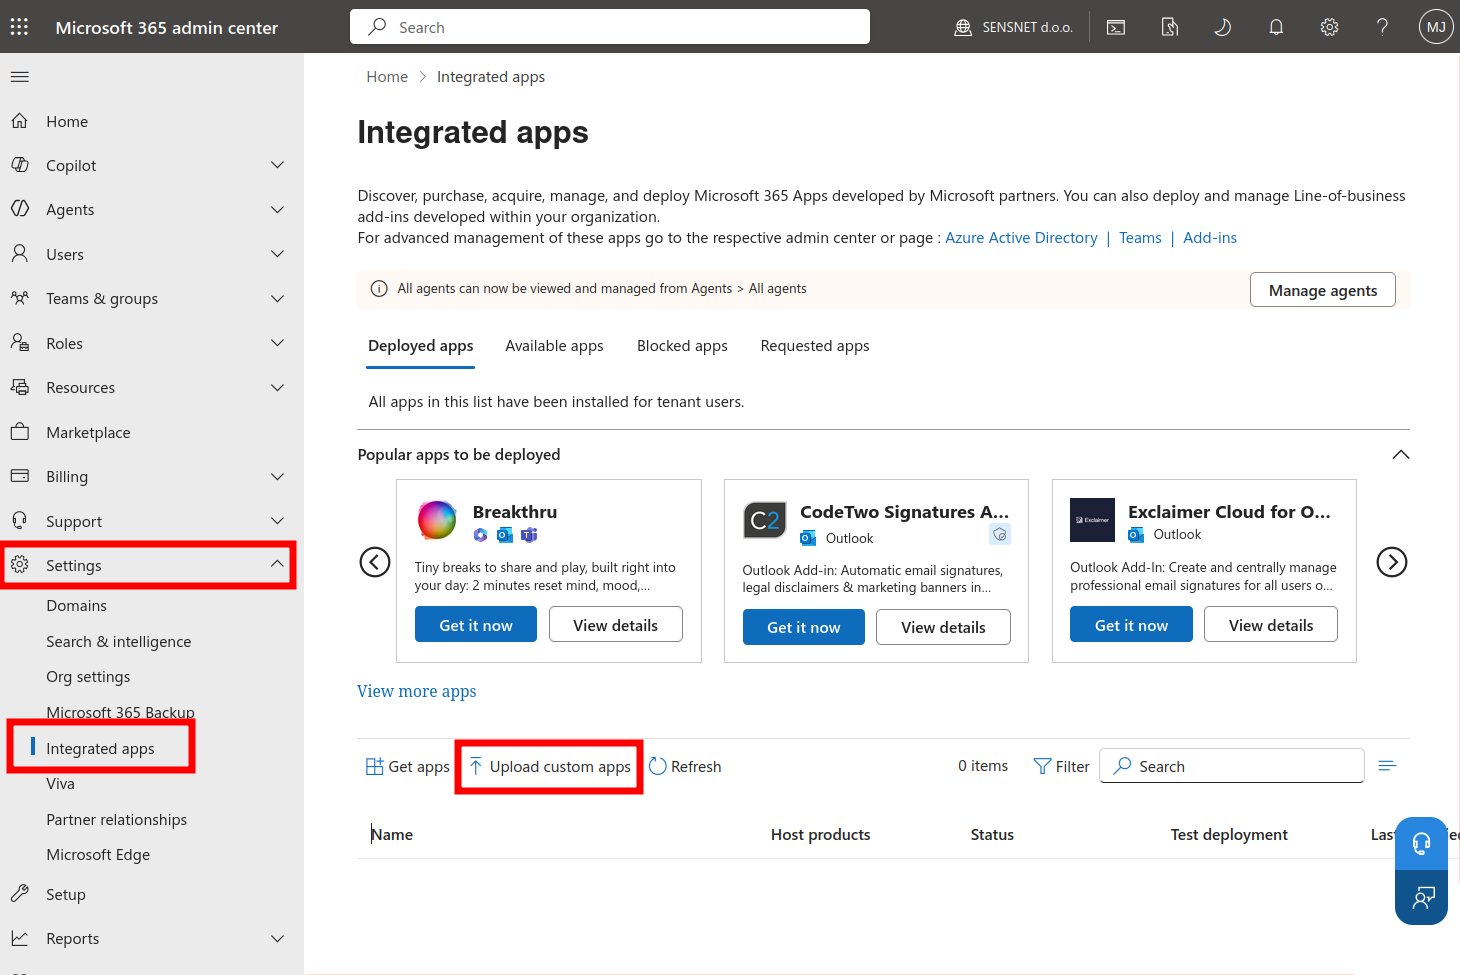
1. Go to the Microsoft 365 admin center: **[https://admin.microsoft.com](https://admin.microsoft.com)**
2. In the left menu, select **Settings**, then **Integrated apps**.
3. Select **Upload custom apps**.
How you install it depends on your account type:
* **Business / work account (Microsoft 365)** — your administrator installs it once for everyone. See **Path A**.
* **Personal account (Outlook.com / free)** — you install it yourself. See **Path B**.
Both paths use the same manifest. **Business** accounts provide it as a link; **personal** accounts download it and upload the file.
The web add-in supports **only Microsoft mailboxes** (Microsoft 365 or Outlook.com). If your support inbox is a **Gmail, IMAP, or POP** account connected to Outlook, use the [classic desktop add-in](/customization/email-assistant/outlook-addin/installation) instead.
```
https://platform.sensbot.ai/outlook/manifest.xml
```
***
## Path A · Business / Microsoft 365 (administrator install)
This path is for a Microsoft 365 **global administrator**. It deploys the Sensbot **panel** to your organization so it appears automatically in your users' Outlook, with no per-user installation.
Installing the panel is separate from connecting the mailbox Sensbot drafts replies for. If you use a **shared mailbox** (like `info@yourstore.com`), or you hit a **"Need admin approval"** screen when connecting, see [Microsoft 365 Setup](/customization/email-assistant/outlook-addin/microsoft-365-setup).
### Before you start
* You need to be a **Global administrator** (or Office Apps admin) in Microsoft 365.
* Your users must have **Exchange Online mailboxes** (any Microsoft 365 Business or Enterprise plan).
### Step 1 · Open Integrated apps
1. Go to the Microsoft 365 admin center: **[https://admin.microsoft.com](https://admin.microsoft.com)**
2. In the left menu, select **Settings**, then **Integrated apps**.
3. Select **Upload custom apps**.
 ### Step 2 · Add the Sensbot manifest
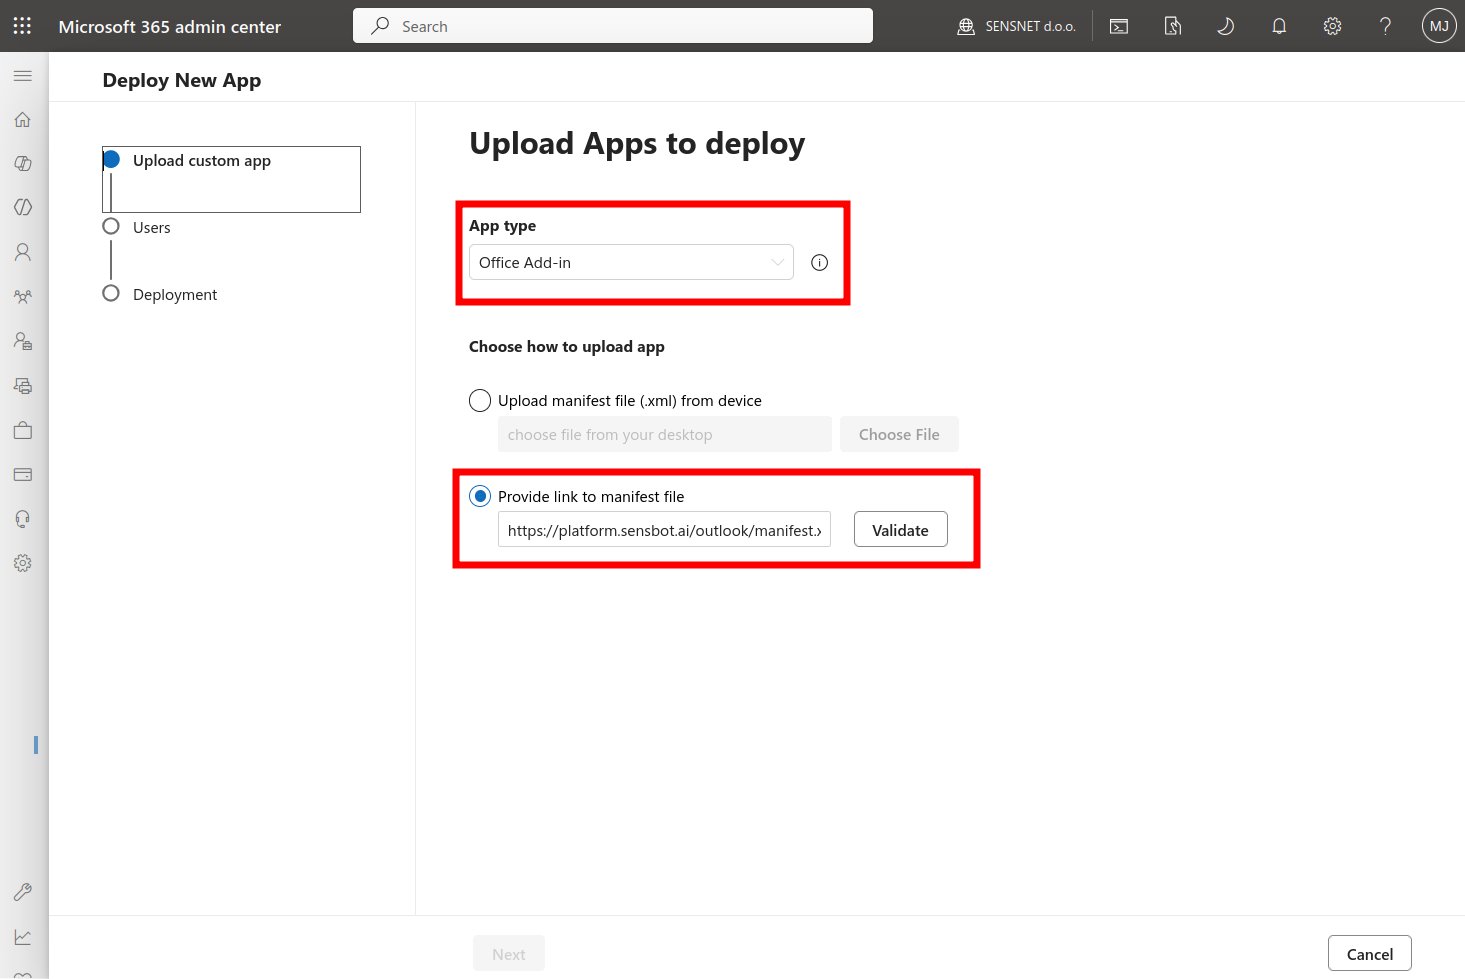
1. For **App type**, choose **Office Add-in**.
2. Choose **Provide link to manifest file**.
3. Paste the manifest link:
```
https://platform.sensbot.ai/outlook/manifest.xml
```
4. Select **Validate**, then **Next**.
### Step 2 · Add the Sensbot manifest
1. For **App type**, choose **Office Add-in**.
2. Choose **Provide link to manifest file**.
3. Paste the manifest link:
```
https://platform.sensbot.ai/outlook/manifest.xml
```
4. Select **Validate**, then **Next**.
 ### Step 3 · Choose who gets it
On the **Add users** page, choose one of:
* **Just me** — to test on your own mailbox first (recommended for the first run).
* **Specific users/groups** — for a pilot group or a department.
* **Entire organization** — for everyone.
Select **Next**.
### Step 4 · Accept permissions and deploy
1. Review the requested capabilities (read the current message and create a reply) and select **Next**.
2. Review the summary and select **Finish deployment**, then **Done**.
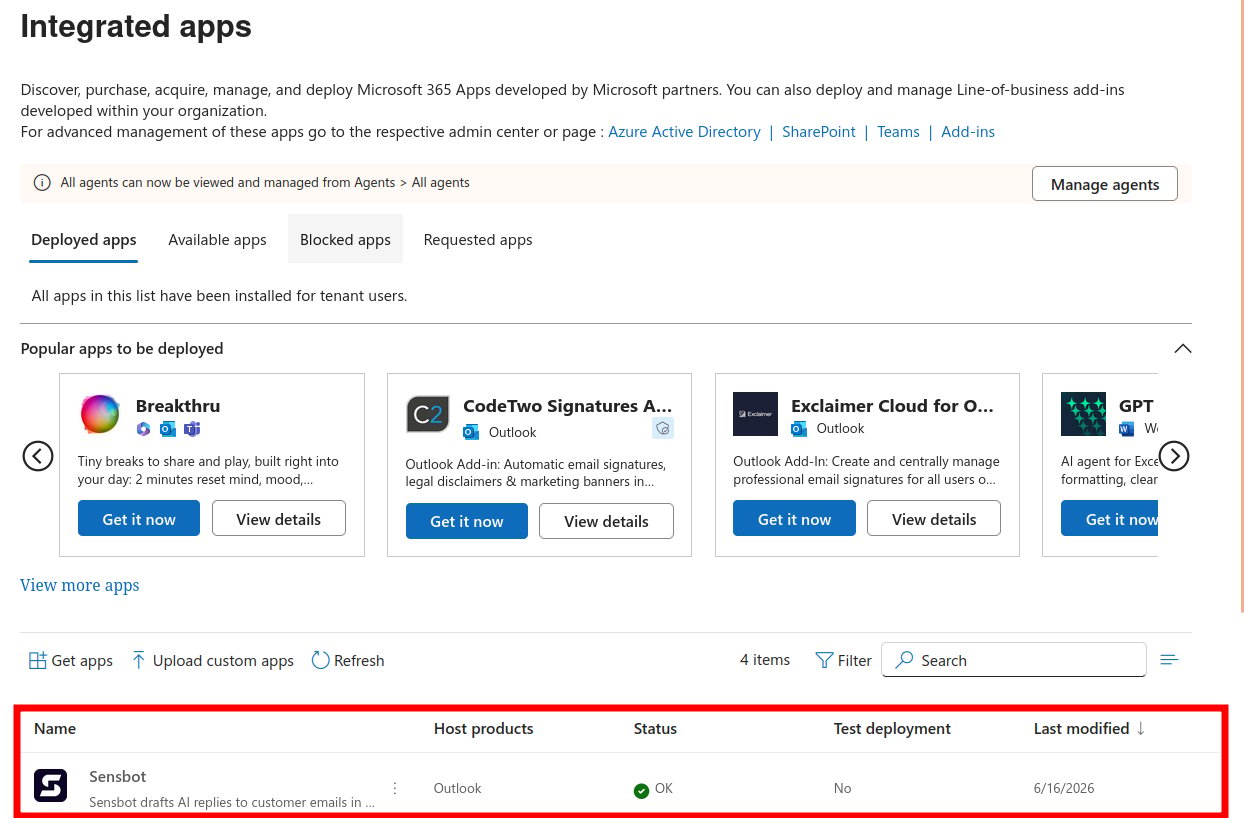
The add-in is now deployed. There is nothing for your users to install. It appears in the **Integrated apps** list with a **Status** of **OK**.
### Step 3 · Choose who gets it
On the **Add users** page, choose one of:
* **Just me** — to test on your own mailbox first (recommended for the first run).
* **Specific users/groups** — for a pilot group or a department.
* **Entire organization** — for everyone.
Select **Next**.
### Step 4 · Accept permissions and deploy
1. Review the requested capabilities (read the current message and create a reply) and select **Next**.
2. Review the summary and select **Finish deployment**, then **Done**.
The add-in is now deployed. There is nothing for your users to install. It appears in the **Integrated apps** list with a **Status** of **OK**.
 ### Step 5 · Wait for it to appear
**Deployment can take up to 72 hours to reach all users.** It usually appears within a few minutes, but this delay is set by **Microsoft, not by Sensbot** — if the add-in isn't visible yet, it's most likely still propagating.
* Deployment reaches users automatically. This usually takes a few minutes, and in some cases **up to 72 hours**.
* Ask users to fully **restart Outlook** once, or to sign out and back in to Outlook on the web.
Continue to [Usage](/customization/email-assistant/outlook-addin/web-usage).
***
## Path B · Personal account (Outlook.com / free)
On a personal Outlook.com account you add Sensbot yourself by downloading the manifest file and uploading it.
### Step 1 · Download the manifest file
1. Open this link in your browser: **[https://platform.sensbot.ai/outlook/manifest.xml](https://platform.sensbot.ai/outlook/manifest.xml)**
2. Save the page to your computer as **manifest.xml** (right-click, then **Save as**).
### Step 2 · Open the custom add-in dialog
1. In Outlook, open or select any email.
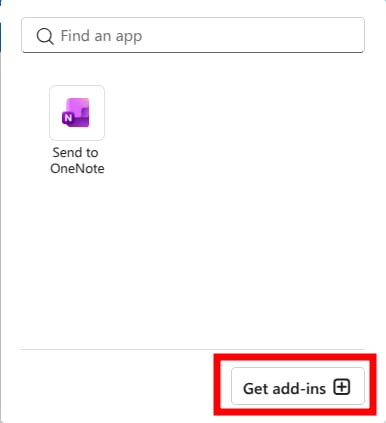
2. Open the add-in picker and select **Get add-ins** (you may find it under the **...** more actions menu).
### Step 5 · Wait for it to appear
**Deployment can take up to 72 hours to reach all users.** It usually appears within a few minutes, but this delay is set by **Microsoft, not by Sensbot** — if the add-in isn't visible yet, it's most likely still propagating.
* Deployment reaches users automatically. This usually takes a few minutes, and in some cases **up to 72 hours**.
* Ask users to fully **restart Outlook** once, or to sign out and back in to Outlook on the web.
Continue to [Usage](/customization/email-assistant/outlook-addin/web-usage).
***
## Path B · Personal account (Outlook.com / free)
On a personal Outlook.com account you add Sensbot yourself by downloading the manifest file and uploading it.
### Step 1 · Download the manifest file
1. Open this link in your browser: **[https://platform.sensbot.ai/outlook/manifest.xml](https://platform.sensbot.ai/outlook/manifest.xml)**
2. Save the page to your computer as **manifest.xml** (right-click, then **Save as**).
### Step 2 · Open the custom add-in dialog
1. In Outlook, open or select any email.
2. Open the add-in picker and select **Get add-ins** (you may find it under the **...** more actions menu).
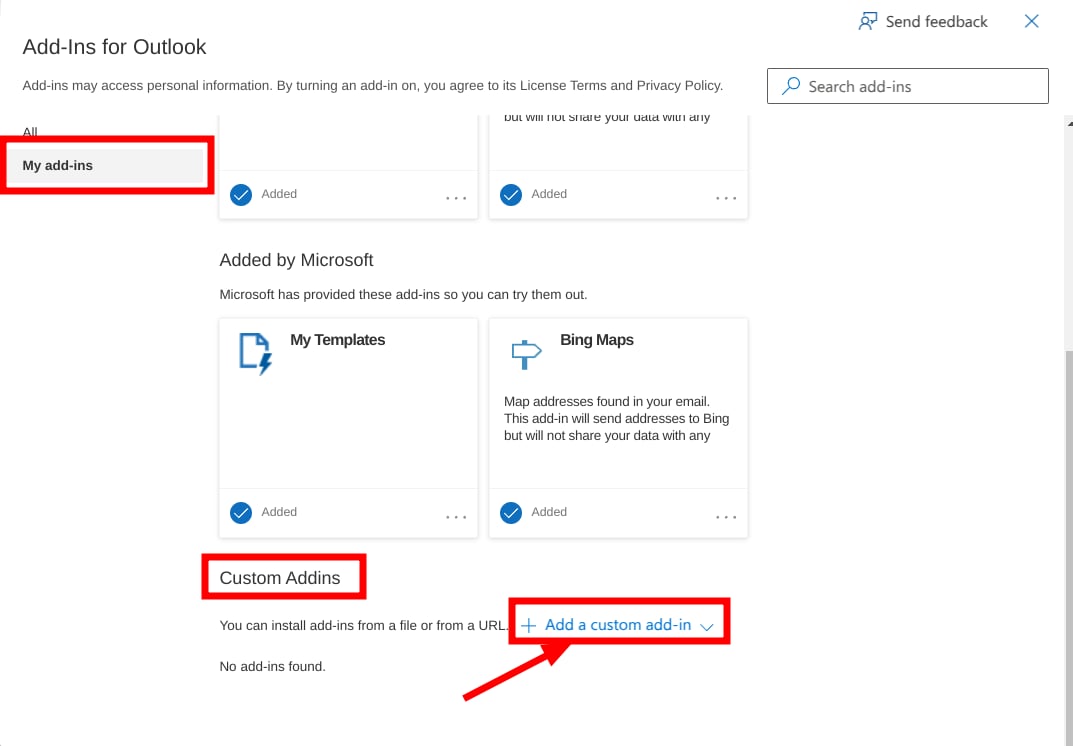
 3. Select the **My add-ins** tab.
4. Scroll down to **Custom Addins**.
5. Select **Add a custom add-in**, then choose **Add from file** and select the **manifest.xml** you downloaded in Step 1.
3. Select the **My add-ins** tab.
4. Scroll down to **Custom Addins**.
5. Select **Add a custom add-in**, then choose **Add from file** and select the **manifest.xml** you downloaded in Step 1.
 ### Step 3 · Confirm
1. Accept the prompt to install the add-in.
2. The **Sensbot** button now appears on the ribbon.
Continue to [Usage](/customization/email-assistant/outlook-addin/web-usage).
***
## Troubleshooting
### The Sensbot button appears but nothing happens when clicked (business accounts)
This is almost always caused by **optional connected experiences** being turned off in your tenant. Sensbot loads its interface over the internet, which requires this setting.
Enable it one of these ways:
* **Per user (Outlook on Windows):** **File → Office Account → Account Privacy → Manage Settings**. Turn on **optional connected experiences**, then restart Outlook.
* **For the organization (admin):** In the Microsoft 365 Apps admin center (**[https://config.office.com](https://config.office.com)**), open **Customization → Policy Management**, and enable **Allow the use of additional optional connected experiences in Office**.
After enabling it, fully restart Outlook and try again.
### The button does not appear yet
* Fully restart Outlook, or sign out and back in to Outlook on the web.
* For business accounts, allow **up to 72 hours** for the deployment to reach everyone.
***
## Updating the add-in later
* **Business:** repeat **Path A · Step 2** with the same manifest link.
* **Personal:** remove and re-add it (**Path B**).
Users may need to restart Outlook once after an update.
## Removing the add-in
* **Business:** Microsoft 365 admin center → **Settings → Integrated apps**, select **Sensbot**, then **Remove**.
* **Personal:** **Get Add-ins → My add-ins**, find **Sensbot** under Custom Add-ins, then remove it.
## Need help
Contact us at **[https://sensbot.ai](https://sensbot.ai)** or email **[support@sensbot.ai](mailto:support@sensbot.ai)** and we will help you complete the setup.
### Step 3 · Confirm
1. Accept the prompt to install the add-in.
2. The **Sensbot** button now appears on the ribbon.
Continue to [Usage](/customization/email-assistant/outlook-addin/web-usage).
***
## Troubleshooting
### The Sensbot button appears but nothing happens when clicked (business accounts)
This is almost always caused by **optional connected experiences** being turned off in your tenant. Sensbot loads its interface over the internet, which requires this setting.
Enable it one of these ways:
* **Per user (Outlook on Windows):** **File → Office Account → Account Privacy → Manage Settings**. Turn on **optional connected experiences**, then restart Outlook.
* **For the organization (admin):** In the Microsoft 365 Apps admin center (**[https://config.office.com](https://config.office.com)**), open **Customization → Policy Management**, and enable **Allow the use of additional optional connected experiences in Office**.
After enabling it, fully restart Outlook and try again.
### The button does not appear yet
* Fully restart Outlook, or sign out and back in to Outlook on the web.
* For business accounts, allow **up to 72 hours** for the deployment to reach everyone.
***
## Updating the add-in later
* **Business:** repeat **Path A · Step 2** with the same manifest link.
* **Personal:** remove and re-add it (**Path B**).
Users may need to restart Outlook once after an update.
## Removing the add-in
* **Business:** Microsoft 365 admin center → **Settings → Integrated apps**, select **Sensbot**, then **Remove**.
* **Personal:** **Get Add-ins → My add-ins**, find **Sensbot** under Custom Add-ins, then remove it.
## Need help
Contact us at **[https://sensbot.ai](https://sensbot.ai)** or email **[support@sensbot.ai](mailto:support@sensbot.ai)** and we will help you complete the setup.